作者:Oz
版权声明:本文图文为博主原创,转载请注明出处。
随着跨平台技术的发展演进,React Native 被越来越多的公司所接受,因此在这里分享一下 React Native 渲染流程,希望能帮助大家对 React Native 进行更深入的理解。
跨平台框架
跨平台一直以来是一个工程实践上的真实需求,用来节约项目开发的人力成本、时间成本等,尤其是在当下移动互联网的时代。在 React Native 诞生之前,已经存在了很多跨平台的方案,例如:Phone Gap 、Xamarin 、Corona 等。
跨平台框架都是伪命题?
- PhoneGap 利用 open-web 技术,即 HTML 5、CSS3 以及 JavaScript 构建移动 Web 应用。
- Xamarin 利用 C# 语言开发原生移动应用,打包时将 C# 转化为对应平台的原生代码。
- Corona 2D 游戏与应用开发平台,利用 lua 进行开发,主要面向游戏开发。
在以上我们提到这个几个跨平台框架,相对来说是被采用较多或比较知名的,但也缺点十分明显。其实在接触 React Native 之前我一直都认为所谓跨平台框架都是伪命题,但是在接触之后,确实改变了我的认识。
基于 JS 的跨平台框架
Facebook在 React.js Conf 2015 大会上推出了基于 JavaScript 的开源框架 React Native。
React Native 结合了 Web 应用和 Native 应用的优势,可以使用 JavaScript 来开发 iOS 和 Android 原生应用。在 JavaScript 中用 React 抽象操作系统原生的 UI 组件,代替 DOM 元素来渲染。这种方案与类似 PhoneGap 这种依赖 open-web 技术方案最大的不同就是 React Native 会将标签元素渲染成原生 UI 组件,从而提升性能及交互体验,使得应用本身更加接近原生应用的体验,也因此有越来越多的公司开始考虑 React Native 的跨平台方案。
启动流程简介
这一节并非是本文重点,是为了下面分析渲染流程进行一些铺垫。
JS 是如何在 Android 上跑起来的?
简单来说,就是通过 Native 发起创建 JS 运行环境,加载 JS bundle 后会执行 AppRegistry::runApplication,引导挂载根组件从而渲染出整个 UI ,具体流程可以参见下图。

JS 端渲染分析
接下来,是本文的重点部分了,从门将先来分析 JS 端的渲染流程是怎样的。
JSX 的转码
JSX 语法是对 JS语法的一种扩展,为了方便开发者在 JS 中编写 UI,在运行期间会通过 BABEL 转码,我们通过一个比较简单的示例来做转码,原始的 React 代码如下:
1 | export default class App extends Component { |
转码后:(经过部分精简,大家也可以通过 BABEL 在线转码以上示例)
1 | var _react = require('react'); |
我们可以看到,原先 JSX 的元素都被 React.createElement 转化为 ReactElement。在 ReactElement 中使用 type字段存放原始对象(在此处就是ReactNative.View/ReactNative.Text),使用 props 存放 childrens、其他传入属性等。
如何生成 React 组件
从一定角度上来说,React 的组件可以分为两种:
- 元组件 框架内置的,可以直接用的组件,不同平台有不同的元组件实现。
- 复合组件 开发者封装之后的组件,一般可以通过 React.createClass 来构建,提供 render() 函数返回渲染元素节点( ES6 中可以继承 React.Component/PureComponent )。
首先,ReactNative 的 js代码都需要通过 AppRegistry.registerComponent 注册对应 appkey 的 Component 才能被启动。我们可以在 AppRegistry.js 中看到它注册了一个对应的回调,在 Native 启动过程中会通过 jsbridge 调用 AppRegistry.runApplication 启动 js 渲染流程,在 js 中会调用对应 runnable ,即后面的renderApplication。
在 renderApplication 时会将传入的 Component 变成 ReactElement,包裹在 AppContainer 中,这个 AppContainer 主要用于外面包围一些 Debug 用的工具(如红盒)。在这之后如上述流程图中一步步走了下去,没什么其他分支,走到 ReactNativeMount 中就会有料出现了,我们来看看:
1 | renderComponent: function( |
这里将传入的 Element 都用 TopLevelWrapper 进行封装,但是它直接透传目标给 render 函数,可以暂时忽略这层。这里通过 instantiateReactComponent 生成了一个渲染对象实例,将 batchedMountComponentIntoNode() 函数提交入回调 Queue,它里面最终会走到 ReactReconciler.mountComponent 里面,直接调用 instance.mountComponent。
接下来就有两处关键地方要理解了:
instantiateReactComponent利用输入的ReactElement生成了什么东西?- 利用
instance.mountComponent怎么进行渲染?
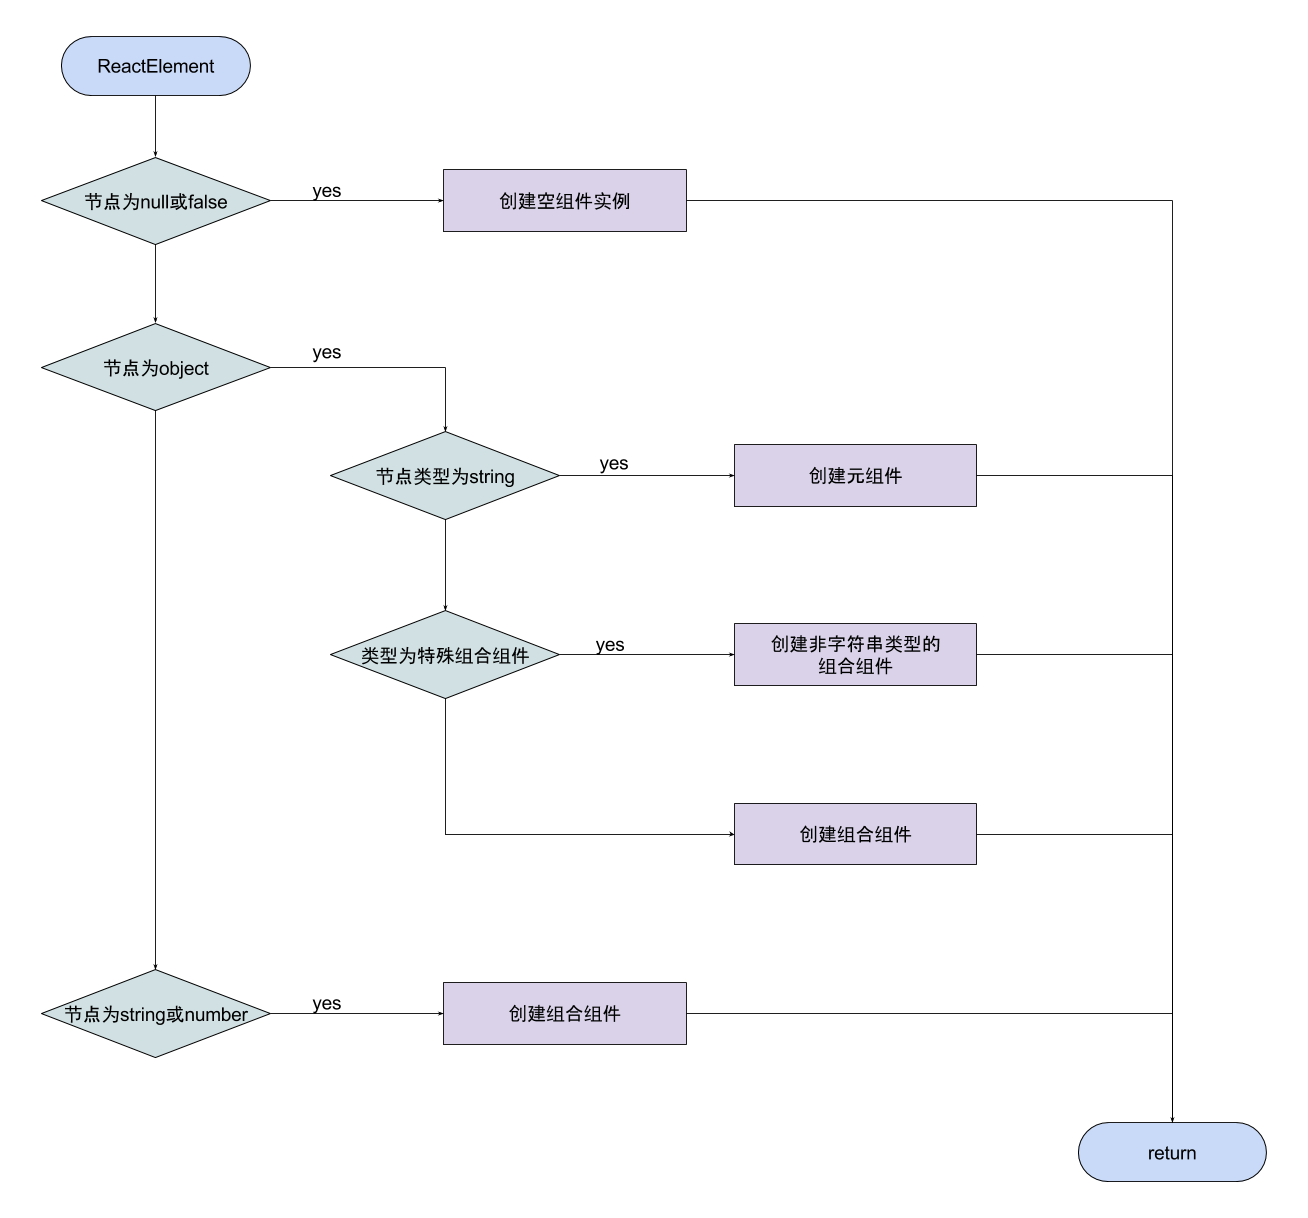
在 React 核心库中提供了 instantiateReactComponent.js,供渲染平台调用。它在碰见 ReactElement 时会根据其中的 type 生成元组件或者复合组件,代码如下:
1 | function instantiateReactComponent(node, shouldHaveDebugID) { |
我们将整个代码逻辑总结如下:
复合组件渲染
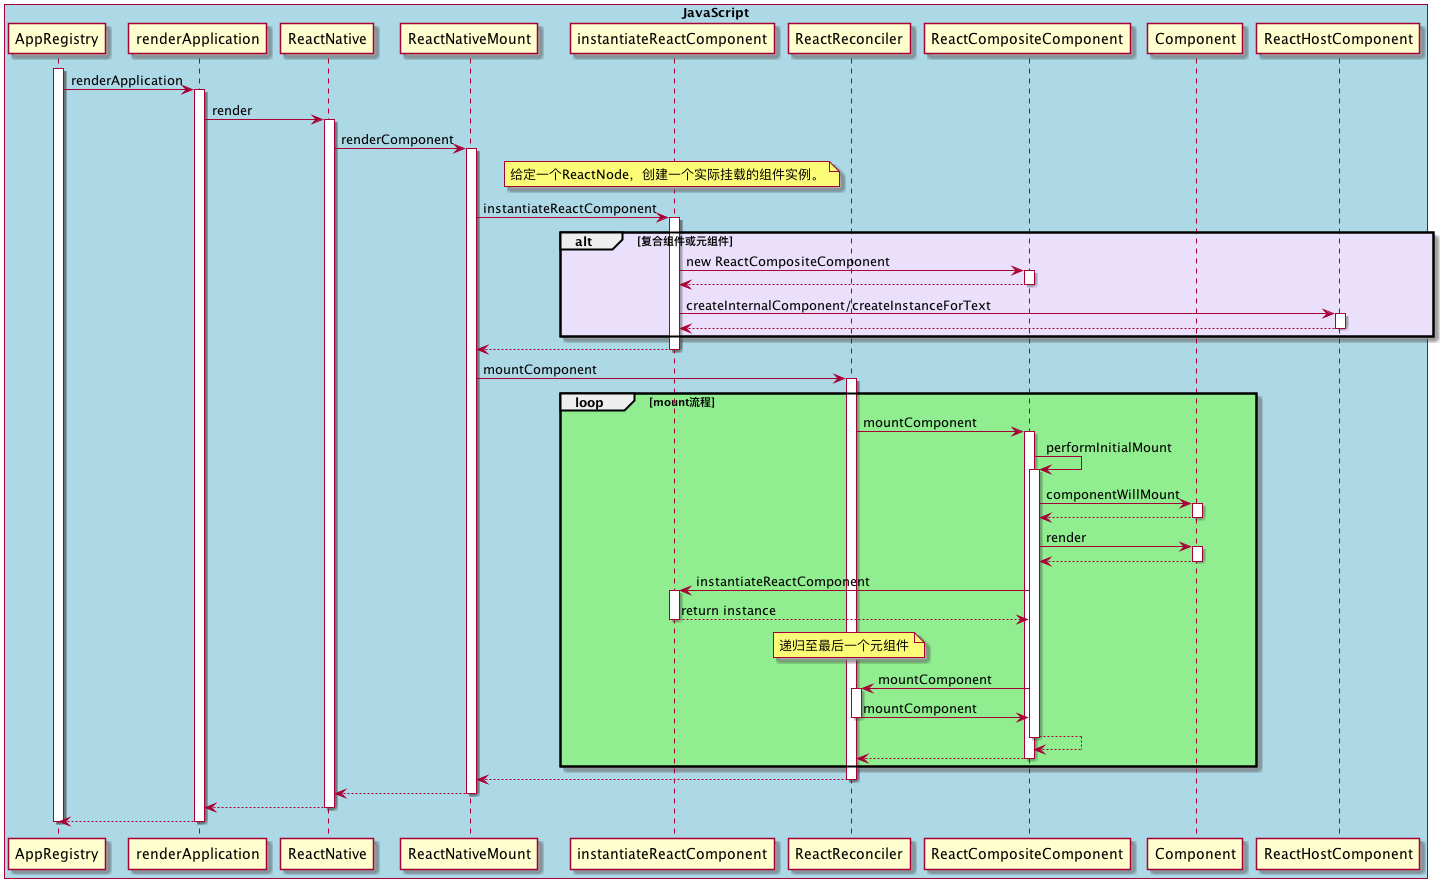
在挂载根组件的时候,由于根组件是复合组件,它会获取 render() 函数返回的渲染节点,并对它继续走 instantiate/mountComponent 的流程。如果 render() 返回的节点还是自定义的复合组件,那这个流程还会向下走,即:mount流程会递归向下调用直到最后一个元组件。
元组件渲染
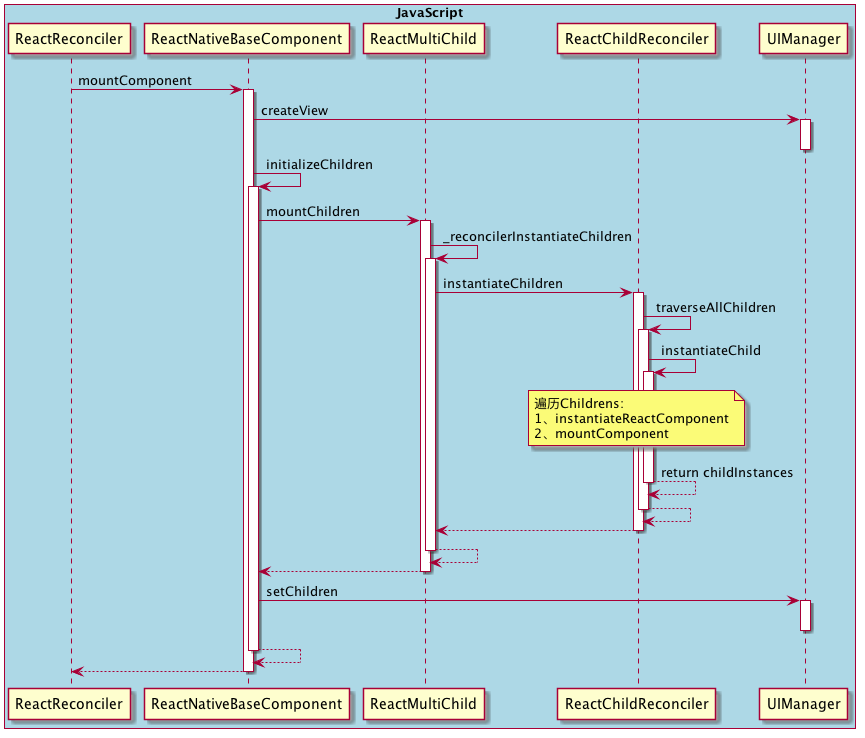
整个元组件也是一个递归渲染的流程,这其中跟复合组件交差挂载,但最终都会转化为元组件进行渲染。
React Native 将代码由 JSX 转化为 JS 组件,启动过程中利用 instantiateReactComponent 将 ReactElement 转化为复合组件 ReactCompositeComponent 与元组件 ReactNativeBaseComponent ,利用 ReactReconciler 对他们进行渲染。
Android 端渲染分析
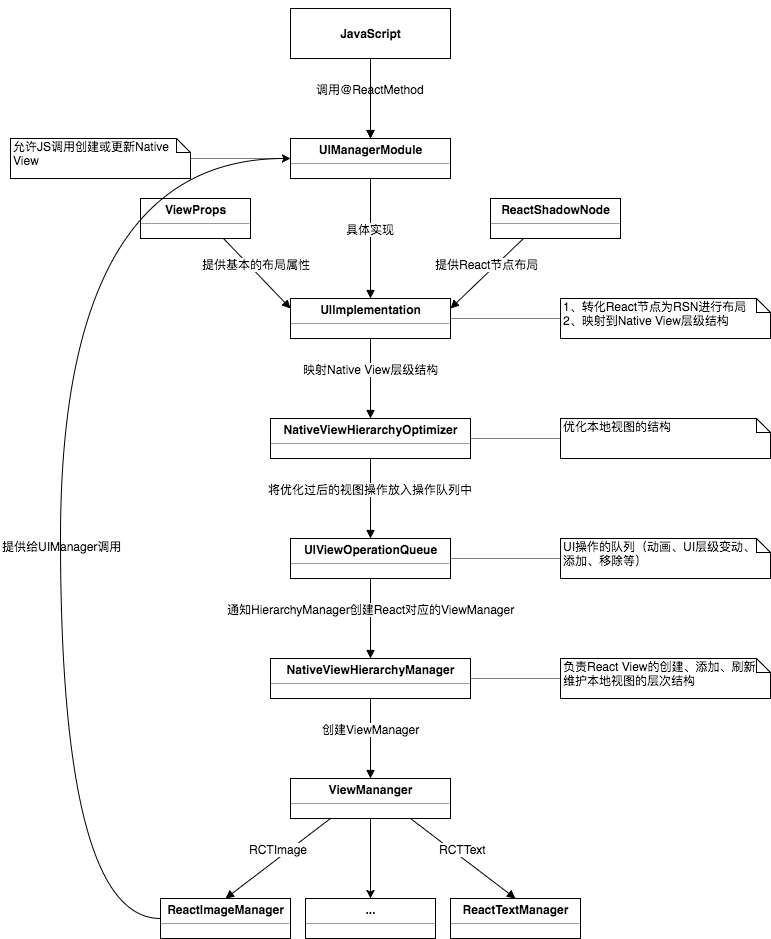
从 js 端也就是 UIManager 调用到 Android 端的 UIManagerMoudule 后则进入了 Native 端的渲染流程,整个流程细节比较复杂,但整体对 UI 操作的流程比较规律,见下图:
以上就是对整个渲染流程的一个简要分析,希望能对正在研究这块内容的同学有所帮助。